Wednesday, January 2, 2013

BIT LOCKER IN WINDOWS 8: LOCKING AFTER UNLOCKING THE DRIVE WITHOUT RESTARTING THE MACHINE

Bit Locker can do wonders..
But when I configured Bit Locker for one of my drives in Windows 8, though it worked smoothly, I faced a real problem!!!!!

I can unlock the Drive.
But...............
I can not lock it.. 
My Bit Locker Encrypted drive remains open, until I restart my Lap.

Tried a lot in many of the sites including the following:-

http://scorpiondivine.blogspot.in/2012/01/how-to-relock-bitlocker-encrypted-drive.html
http://jonamafun.blogspot.in/2009/11/how-to-re-lock-bitlocker-drive.html

I sincerely thanks the efforts put in by both Bloggers.

But, things didn't work for me.
Finally, after a lot of investigations, i found out the real reason is the Villain named "Elevated privileges".

Anyway, I worked it out my way, with inputs from the above site and I am sharing these for you...!

STEP-1
Copy the following which is in RED and paste it on a Notepad file.

manage-bde -lock G: -forcedismount  

Please take a note to replace the G: with the corresponding one of your Bit Locker drive Letter.

Save the Notepad as lock.bat 

Copy this file to the C:\Windows folder.

STEP-2

Now Copy the following which is in BLUE and paste it on a Notepad file.


Windows Registry Editor Version 5.00

[HKEY_CLASSES_ROOT\Drive\shell\runas]
@="Lock"

[HKEY_CLASSES_ROOT\Drive\shell\runas\AppliesTo]
@="G:\\"

[HKEY_CLASSES_ROOT\Drive\shell\runas\command]
@="runas /user:pradeep\\administrator /savecred c:\\windows\\lock.bat"

make the following changes:-

In the  @="G:\\" part, put the Drive Letter of your Bit Locker drive. Eg. @="D:\\"

In the @="runas /user:pradeep\\administrator /savecred c:\\windows\\lock.bat" part,
pay attention towards,user:pradeep\\administrator.
pradeep is my Computer Name.
You have to replace pradeep with your Computer Name (You can check it by Right clicking My Computer Icon on your Desktop and Selecting properties. Else, you may type sysdm.cpl in RUN or COMMAND PROMPT and press ENTER, you will get the Computer Name).

After theses changes, save the Notepad as lock.reg somewhere on desktop.

STEP-3

Now, double click the lock.reg file. It will give out some warnings, don't worry, Click YES and you will get a Completion Message and Click OK

STEP-4
 
Now go to Command Prompt or RUN, type lusrmgr.msc and enter.
you will get a Console Window for Users and Group. It will look like the below given picture. (Click on the picture to enlarge it.)

STEP-5

Right Click on the Administrator and Select Properties.
remove the tick mark in front of "Account is Disabled".
It should look as follows:-


Click Apply and OK.

STEP-6

Now, Right Click the Administrator and select Set Password.
There will be a Warning Message as follows:-


Click Proceed and the next window opens:-


Give a Password of your Choice in the First Space and repeat the same in the next space.
Click OK.
You will get a Confirmation that the Password is Set. Click OK.

STEP-7

Restart your Machine.

Unlock your Bit Locker drive with your password.

STEP-8

Now Right Click the Bit Locker Drive.......
You will see...


A selectable "Lock" in the context.
Click the "Lock".
the following appears..

Type the password which you have given in STEP- 6.
You will not be able to see what you type, so please be careful to give the correct password.

A black screen pops up...... and ..
Your Drive is Locked....!

That's all...
----------------
For any clarifications, doubts, please mail me at pradeepthegreat2010@gmail.com.
I will be more than happy to help.

Thank You and if you like the post, please Join this site.


Tuesday, March 15, 2011

Generic host process for win32 services has encountered a problem and needs to close.

This is a problem faced by most Windows XP users while they are connected to the internet. You are connected to the internet and after a few minute’s hassle free surfing, the following message appears:-

blogg

If you click the ‘Don’t Send’ button- The internet stops. Then you have to restart the PC for internet surfing. Again after a few minutes, the same drama happens.

Solve this through a slight Registry manipulation. Open Registry Editor and navigate to the following key-

Regedit > HKEY_LOCAL_MACHINE > System > Current Control Set > Services > NetBT > Parameters . (See the screen shot)

asw

Click on the Parameter key and on Right pane you will see a key “TransportBindName” with value “\Device\”. Double click on the key and clear the value. (You are deleting the value “\Device\”). Now the key is without any value or the value is Blank.

Next navigate to the following key-

Regedit >HKEY_LOCAL_MACHINE > Software >Microsoft>Ole

(See the screenshot).

as

Click on the key “Ole” and in the right pane double click the key “EnableDCOM”. The default value is “Y” and make it “N” by changing it.

Close the Registry editor and restart the windows. You won’t get that annoying message anymore and enjoy a hassle free internet.
Saturday, December 25, 2010

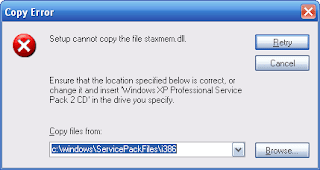
"Setup Cannot Copy the File Staxmem.Dll" Error Message

"Setup Cannot Copy the File Staxmem.Dll" Error Message
My god... It almost landed me in the midst of nowhere.
I was performing a repair of Windows XP and at a particular point, I got stuck up.
This staxmem.dll problem.


I could see the file in i386 folder of the CD as well as in Directory... but the copy error remained despite of my efforts to get the file from alternate locations.
Then I consulted Google- my ultimate Guru- and found so many pages with such problems.
Mostly answered by MVPs and other Masters of Computer Scince........ but all the solutions lead me again to the same dead end.
In fact, his was not the answer exactly I needed to my problem, but something like that .
So, I derived a way out of that solution to solve my problem.
Here during the installation, I activated a Command Prompt.
(How to do that...? See my Next Post....!)
Now give the following command on the Command Prompt:-
esentutl /g %windir%\security\database\secedit.sdb
Enter
Now things happen as you see in the fllowing screenshot.

Now give the next command in the Command Prompt:-
esentutl /p %windir%\security\database\secedit.sdb
The following Warning Message is displayed:-

Give OK and the following things happen as shown in the Screenshot.
When the Command completes.....
Press the 'Retry' Button on the Copy Error Message Box (First Picture).
There won't be any Staxmem.dll error and the file get installed easily....
Wow and now my installation is complete.....
Thanks to the one who provided me a clue......

Wednesday, December 22, 2010

TELNET IN WINDOWS 7- HOW TO GET IT?

When you go to a command prompt in Windows 7 and give our way old Telnet command, oh.... it says "Telnet is not recognized as an internal or external command, operable program or batch file".
Don't worry... Telnet is not enabled in Windows 7 by default. It is very easy to bring Telnet back in action. Follow the steps....
Start Menu > Control Panel > Programs and Features
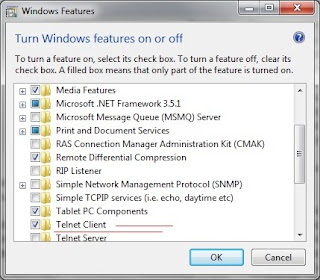
On the left side border, you will find "Turn Windows features on or off".
Click it and the folowing window appears.

Select Telnet Client (As Underlined in the picture)
Press OK.
A Progress Bar that shows the configuration appears and completes itself.
Now close everything...
Go to a Command Prompt....
and
Telnet.
Ya it is there....

Monday, December 13, 2010

BACKUP ERROR: VOLUME SHADOW COPY CREATION: ATTEMPT1 TIMED OUT BEFORE FUNCTION COMPLETED. ERROR RETURNED WHILE CREATING THE VOLUME SHADOW COPY 0xfffff

BACKUP ERROR: " VOLUME SHADOW COPY CREATION: ATTEMPT1 TIMED OUT BEFORE FUNCTION COMPLETED. ERROR RETURNED WHILE CREATING THE VOLUME SHADOW COPY 0xfffff . ABORTING BACKUP."


Interesting and more over annoying message. This is a nightmare for Sysadmins and Backup Operators mainly observed in Windows 2003 Servers and XP. Let's resolve it by following the below points exactly:- All the following commands are to be executed on a Commpand Prompt.


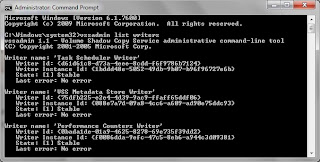
(1) On Command Prompt type vssadmin list writers
The following screen opens.


(2) If there is no such display comes, C:\Regsvr32 ole32.dll
(3) Run Step-1
(4) cd %windir%\system32
(5) Net stop vss (message displays as service stopped)
(6) Net stop swprv
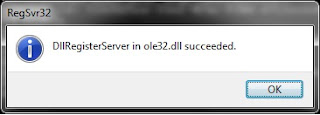
(7) regsvr32 ole32.dll (for every successful command, the following screen appears)


(8) regsvr32 oleaut32.dll
(9) regsvr32 vss_ps.dll
(10) vssvc /register (MySQL repairs itself. Do not interrupt).
(11) regsvr32 /i swprv.dll
(12) regsvr32 /i eventcls.dll (or) regsvr32 eventcls.dll
(13) regsvr32 es.dll
(14) regsvr32 stdprov.dll
(15) regsvr32 vssui.dll
(16) regsvr32 msxml.dll
(17) regsvr32 msxml3.dll
(18) regsvr32 msxml4.dll
(19) net start vss
(20) net start swprv

That's all and this should solve the problem.
Now run the backup and see for the difference.

Saturday, November 27, 2010

COMMAND PROMPT FOR SYSTEM ADMINISTRATORS

Here I post something for the System Administrators, a set of most useful commands those can be executed from a Command Prompt.

In a Windows Server Domain, it become inevitable to make a change in certain client's Policy or update the Group Policy of a single PC. Administrators always prefer the Snap-in management Method... but here let's do it in old school method.
TO ACCESS THE POLICY SNAP IN OF REMOTE PC:-
Open Command Prompt
gpedit.msc /gpcomputer:
Here you may address the PC either by its IP Address or by its Domain Name
for example-
gpedit.msc /gpcomputer: 192.168.1.75
OR
gpedit.msc /gpcomputer: adminspc

The Group Policy Snap In of the specified PC opens up. You may amend as required and close the SNAP IN.

Now to make the change effective immediately-
GPUpdate /target: User /force /wait
The Wait indicates the time wait (default is 600 second) before applying the policy.
Example
GPUpdate /target: adminpc User /force /wait:2
Here wait:2 is waiting 2 seconds.

You may delve into much more- On Command Prompt, try
Gpedit /?

Friday, April 23, 2010

HOW TO ACTIVATE WINDOWS 7: STEP BY STEP

For all those having difficulty / problems for activating Windows 7, here is a superb step-by-step guide by Ask Dr. Tech.

Follow the link and you will get step-by-step instructions with ample Screen Shots.

http://www.askdrtech.com/solutions/post/How-To-Activate-Windows-7-by-Phone.aspx

Sunday, February 28, 2010

ADDING SAFE MODE TO BOOT LIST

Atleast once, every PC user had the requirement of booting on to Safe Mode for one or other problem rectification. Normally it is done by pressing the F8 key while booting on and going to the boot menu and then selecting the Safe Mode options. At times this become tedious because of missing the right time in pressing F8 or restrictions in some motherboard specifications those provide a drive choice menu etc.

The problem can be solved by adding a line to the boot.ini file. I will describe it in the following lines. To perform the following actions, you must be a member of the Administrator group.

STEP-1

Start Menu > Run
Type cmd
Enter


Command prompt opens up.

Navigate to the root Drive C:\ by typing cd \
(Here I assume that your Windows is in C Drive)

Here type attrib -s -h -r boot.ini

STEP-2

Now go to
Start Menu > Run
Type C:\boot.ini
Enter


The boot.ini file opens up.
Add the following lines as the last line.
multi(0)disk(0)rdisk(0)partition(2)\WINDOWS=Microsoft Windows XP-SafeMode" /fastdetect /Safeboot:minimal/SOS/bootlog

Now close the file and it will prompt you to save changes. Save the changes by clicking YES.
Go to the already opened Command Prompt and type the following:-
attrib +s +h +r boot.ini

Close the command prompt and restart your System.
Now after BIOS you will get an Option Menu. Here you may boot into your Windows normally or you may boot into Safe Mode.

If you feel problem in doing STEP-2 there is an easier way.
Right click MyComputer icom on desktop and select properties.
System Properties box opens up.
Click the
Advanced tab.
Go to
Startup and Recovery and click settings. Startup and Recovery box opens up.
Click the
Edit button and the boot.ini file opens up.
Here you may add the line as mentioned in STEP-2 and close the file and save it.


Thats all.

If your Windows is not in C: drive, ask me. I will guide you further.
pradeepthegreat2010@gmail.com

FINDING DRIVE LOCATION OF WINDOWS

Many novices find it difficult to decide in which drive their Windows OS is installed.
How to check it?

Start Menu > Run
Type %systemroot%
Enter

A window opens and in the address you may see C:\Windows or D:\Windows etc.

Other commands you can try are:-

%systemdrive% - Opens the Drive where Windows is installed
%windir% - Opens up the Windows Directory

That's all.

AUTOMATIC OPENING (POP OPEN) OF A FOLDER ON LOGON

Many times it was observed that a folder- some times My Documents, otherwise System32- pops open immediately after logon. This is normally due to a registry mismanipulation. The problem can be solved in the following manner.

To perform the following actions you must be a member of Administrator group.

Start Menu > Run
Type regedit
Enter

Registry Editor opens.

Navigate to the following key-
HKEY_LOCAL_MACHINE > Software > Microsoft > Windows NT > Current Version > Winlogon
On the right pane, select the key Userinit and modify the value as - C:\Windows\System32\Userinit
(Value can be modified by double clicking the key and then type the value in the following box.)

Now navigate to-
HKEY_CURRENT_USER > Software > Microsoft > Current Version > Explorer > Advanced
On the right pane, change the value of key PersistBrowsers to 0.
Close the Registry Editor.

Restart the PC and the problem is solved.

Questions ?- pradeepthegreat2010@gmail.com

Monday, February 22, 2010

CAN NOT FIND SCRIPT ENGINE "VBSCRIPT" FOR SCRIPT ... MESSAGE ON LOGON

Recently I have observed the subject problem in one of the Windows XP Pro SP-I PC. This annoying message popped up on every logon quoting some script name. The reason behind was a corrupted or missing DLL file possibly by a malicious activity which was healed by an Antivirus.
How to fix it?
An extensive search in Google gave me many outputs. The one which worked for me was the following one.
Start Menu > Run
Type the following in the Run field...
regsvr32 %systemroot%\system32\vbscript.dll
Press enter. You will get a positive confirmation message "DllRegisterserver in C:\windows\system32\vbscript.dll is succeeded"
And the problem is killed.
Another way of doing this is by editing the registry.
I assume that you know the basic registry editing functions and precautions. If not, take the guidance of an expert friend or ask me for more details.
Startmenu > Run > regedit
Enter

Navigate to HKEY_CLASSES_ROOT > CLSID > {B54F3741-5B07-11Cf-A4B0-00AA00A55E8}> InprocServer32
On the right side pane change the value of Default Key to C:\WINDOWS\system32\vbscript.dll (provided your Windows is in C Drive.)

Close the Registry Editor and Restart your PC.

That's all.
Doubts? contact me - pradeepthegreat2010@gmail.com

Tuesday, April 7, 2009

REGISTRY EDITOR IS DISABLED.

It is a natural phenomena to get the message "Registry Editor is disabled by your Administrator", whenever trying to open 'Regedit'following a Virus/Worm removal. Though you are the Administrator, the message remains annoying.. NO...?


There are many ways to get rid of this message and get your Regedit working. The most reliable and easy one is the Symantec solution. Download the file "UnHookExec.inf" from the following link ..... http://securityresponse.symantec.com/avcenter/UnHookExec.inf Its only 615 KB. Save it onto your desktop. Right click and click Install. Thats all... You will get back your registry.


NOTE: If the file is opening in a page as some lines instead of downloading as a file, dont worry. Copy the contents to a notepad and save it as UnHookExec.inf.
Try this and let me know.

The remaining methods will be discussed soon, if someone is interested.

Saturday, January 17, 2009

INSTALL WINDOWS XP ON VISTA INSTALLED PC AND DUELBOOT

You bought a new laptop or PC with pre-installed Windows Vista. You want to Install Windows XP in that and use duel boot option. Here is my way of doing it. No third party softwre required. You need only the CDs of Windows Vista and Windows XP.

This is a bit complicated and advance level operation, so be careful about the procedure. If you miss any of the following lines, you are going to end up with a PC without Operating System. Before starting, I declare that the following procedure is to be executed on your own risk and I will not be responsible for any after effects.

Let's start, if you are confident. I assume that you are confident in installing Windows XP.

Let's imagine that Vista is installed in the C drive.

1. Free up another partition or create a partition using Disk management utility of Vista. Format that partition and mark it as active if possible. Let's assume that we are going to install XP onto the D drive, so assign the drive letter D to newly created partition..

2. Boot from XP CD and install it onto D drive. That means after copying the required files for installation, the system will ask you to proceed further fo installation by asking you to accept the EULA (End User License Agreement). On accepting the agreement by pressing F8 key, the System will search for previous installations of Windows and will show you the active partitions. Here select D drive and proceed further and the normal installation continues.
3. After the ritual restarts finally XP gets installed on your D drive.
4. When you restart the PC, it will automatically boot onto XP. That means your Vista is lost to XP.
5. Don't panic.
6. Logon to XP and insert your Vista CD in the CD drive.
7. Open command prompt by typing cmd on the Start Menu> Run
8. Type the folowing commands, enter one by one:-
X: (Here X: is the drive letter of your CD Drive. eg. F:, G:, H: etc)
cd boot
bootsect /NT60 All
9. You will see some positive and negative messages.......
10. Close the command prompt and restart the PC.
11. Now you will automatically boot onto Vista, i.e. XP is lost to Vista.
12. Again don't panic.
13. Logon to Vista.
14. Go to Start Menu > All Programs >Accessories> Command Prompt.
15. Right click Command prompt and select Run as Administrator.
16. Vista will prompt for confirmation and the command prompt opens up.
17. Give the following commands in the command prompt (enter one by one).
(a) C:\windows\system32\bcdedit -create {ntldr} -d "XP"
(b) C:\windows\system32\bcdedit -set {ntldr} device partition=D:
(In step b, D: is given as the XP is installed in D: drive)
(c) C:\windows\system32\bcdedit -set {ntldr} path \ntldr
(d) C:\windows\system32\bcdedit -displayorder {ntldr} -addlast

18. After executing the above commands close the command prompt and restart the PC.
19. You will get a Duel boot screen showing both Vista and Previous Versions of Windows.
20. Select Previous Versions of Windows and press
21. Normally you will boot into XP. If you are able to boot into XP, its great. Restart the PC and select Vista from the Duel boot screen and se whether Vista is working OK....... It,s done.
22. But after selecting XP, if you get a black screen with following error message, we have to do a little more:-
File: \ntldr
Status: 0 xc000000f

23. Don't worry
24. Press the magicl keys, CTRL+ALT+DEL to restart the PC.
25. Select Vista from the Duel Boot screen and boot onto Vista.
26. After logging onto Vista insert the Windows XP CD in the CD Drive.
27. Repeat step 15.
28. On command prompt give the following commands (enter one by one):-
(a) X: (Here X: is the drive letter of your CD Drive. eg. F:, G:, H: etc)
(b) cd i386
(c) copy ntldr D:\
(d) copy ntdetect.com D:\
(e) C:
(f) attrib -s -h -r boot.ini
29. Close the command prompt.
30. Open My Computer and open C drive.
31. You will see a file named boot.ini in C drive.
32. Double click boot.ini, it will open in notepad.
33. See the folowing lines and amend it accordingly.
[boot loader]
timeout=30
default=multi(0)disk(0)rdisk(0)partition(2)\WINDOWS
[operating systems]
multi(0)disk(0)rdisk(0)partition(2)\WINDOWS="Microsoft Windows XP Professional" /noexecute=optin /fastdetect

(See the partition(2) section, it's (2) bcoz our XP is in D drive. If XP is in E, it will be (3))
34. After amendments close the notepad, it will prompt you to save changes. Save it.
35. Copy the boot.ini file and paste it in D: drive.
36. Repeat step No.15.
37. On command prompt, execute folowing commands (enter one by one):
(a) attrib +s +h +r boot.ini
(b) attrib +s +h +r ntldr
(c) attrib +s +h +r ntdetect.com

38. Close the command prompt.
39. Restart the PC.
40. On the Duel Boot Screen, select Previous Versions Windows, it will boot onto XP. Or if you select Vista, it will boot onto Vista.........

Enjoy and let me know ....... how was it?

cool hit counters
download an html hit counter

Add to Technorati Favorites

Thursday, December 11, 2008

W32.Downadup

W32.Downadup is a worm exploit using server service RPC in Windows OS. It is exploiting the update MS008-067.
SYMPTOMS
*. Internet Explorer Displays "Page cannot be displayed message" after 3-4 minutes of loading page and further the message remains until next restart. same is repeated.
*. Mozilla Firefox gives you a blank page.
*. Network PCs ping normally, but share drives are not available sometimes.
*. There will be a 'WWW' exception in windows firewall with a unique port number.
*. No suspicious processes running on task manager.
*. No relevent startup entries in 'msconfig'.
*. On command prompt when giving "netstat -aon" command, lot of activity is detected on port no.445 and 139 with unknown IP addresses(SYN_SENT).

SOLUTION
Run Symantec Antivirus with latest update (20081210-009-x86.exe). Run a complete scan of the system. This should detect W32.Downadup as espceao[1].jpg. There may be more entries in System32 folder named 'tsozzqlj.dll' & 'kmqohj[2].dll.


(Click the picture to view complete image)
The virus/worm will be quarantined. Let the scan complete.
Now Go to control panel, open Firewall, click on exceptions tab, look for an entry called 'WWW'. If it is there delete it.
Restart your system. That should kill the problem.
If the above worms are not detected, you may boot into safe mode and run virus scan. Otherwise you may remove the files manually also.

cool hit counters
download an html hit counter

Add to Technorati Favorites

Friday, March 21, 2008

WINDOWS RESTARTING AGAIN & AGAIN

Fed up with endless POSTing while trying to boot on to Windows. You are being presented with the Boot option menu, where it is asking you to select starting in-
and after selecting any of these without even a warning restarting. Here is a small solution, you may try.
Again we will have to use Recovery Console. Select CD-drive as your first boot device in BIOS. Insert the Windows XP CD in your Drive and restart the machine. you will be prompted to 'Press any key to boot from CD'. After pressing any of the keys, the Setup drivers will load and finlly you will be greeted with a screen as follows:-
Press R and proceed further. You will be prompted to select your OS Drive. Normally you enter '1' provided your OS is loaded in the C Drive. Now you will be prompted to enter your PC's local Administrator Password and after entering it you will reach to a Command Prompt C:\WINDOWS>

Here you will have to type the command FIXBOOT and enter. (This command writes a new boot sector onto your PC's system partition). Accept the warnings or confirmations. You will be prompted to restart your PC or simply type EXIT to restart. The next time your PC must boot normally. Try this and let me know.

If still the problem persists, follow the same route and Try FIXMBR instead of FIXBOOT to get your Master Boot Record repaired. This is a bit risky one as Microsoft says there is a chance of getting your Hard Drive Unusable. But I have tried this and worked well with me in more than 50 cases.

Add to Technorati Favorites
cool hit counters
download an html hit counter

Thursday, March 20, 2008

CONTROL PANEL SHORTCUTS

You may reach to all of the Control Panel applets through commands. Go to Start Menu >> Run , enter the following command and see what you achieve. By heart the following and once in your life time you will thank me.

CONTROL - Control Panel
ACCESS.CPL - Accessibility options
APPWIZ.CPL - Add Remove Programs/ Window components
DESK.CPL - Display Properties
FIREWALL.CPL - Windows Firewall
HDWWIZ.CPL - Add a Hardware
INETCPL.CPL - Internet Properties
INTL.CPL - Regional & Language Options (Includes Date & Time format)
JOY.CPL - Game Controllers
MAIN.CPL - Mouse Properties
MMSYS.CPL - Sounds and Audio Device Properties
NCPA.CPL - Network Connections
NETSETUP.CPL - Network Setup Wizard
NUSRMGR.CPL - User Accounts
POWERCFG.CPL - Power Configuration Properties
SYSDM.CPL - System Properties
TELEPHON.CPL - Phone and Modem Options
TIMEDATE.CPL - Time & Date Properties
WSCUI.CPL - Windows security Centre
WUAUCPL.CPL - Automatic Updates

WISHING U THE BEST.
Add to Technorati Favorites
cool hit counters
download an html hit counter

Monday, March 17, 2008

A DIFFERENT WAY OF BOOTING ONTO WINDOWS.

Are you tired of watching the same Load Progress Screen of Microsoft Windows while booting on? Are you bored of waiting for the progress bar to stop rolling in slow PCs? Let’s go a bit in Linux way, the Open Booting. Let’s watch what all are the drivers being loaded in the background to get your windows opened. Here is that small magic.

Go to ‘RUN’ , type C:\boot.ini and press enter.
A text file opens with some line written on it (Please see the picture below). Go for a line which starts with ‘multi(0)disk(0)rdisk(0)partition(1)\WINDOWS="Microsoft Windows XP Professional" /noexecute=optin /fastdetect . After /fastdetect you have to add the following so as the line will look like this:-
multi(0)disk(0)rdisk(0)partition(1)\WINDOWS="Microsoft Windows XP Professional" /noexecute=optin /fastdetect /sos /NOGUIBOOT
(Your kind attention is solicited towards the single space after fastdetect and /, also between sos and /. That means:-
multi(0)disk(0)rdisk(0)partition(1)\WINDOWS="Microsoft Windows XP Professional" /noexecute=optin /fastdetect /sos /NOGUIBOOT )
Now, save and close the file. Restart your PC to view the change. You’ll really feel great. The booting will be similar to a booting in SAFE MODE. When you want a back in traditional state, run the same process and remove the Strings ‘/sos /NOGUIBOOT’. Restart, you will get your familiar old Progress Bar.
Add to Technorati Favorites
cool hit counters
download an html hit counter

Thursday, March 13, 2008

DRIVES ARE NOT OPENING ON DOUBLE CLICK / CAN NOT FIND COPY.EXE

Many of us might have experienced the DOUBLE CLICK trouble. Usually when you double click on any Drives, they open and show the file contents. But in some cases the machine hang up or give an error message like “Can not find Copy.exe” or “VB Script Error” or like wise messages. In most cases one would be able to Right Click on the drive and Explore the drive contents. But in some cases this also won’t work.

Don’t worry !!!!. This is the strong evidence of an infection in your PC or you were having an infection which was quarantined/ deleted by your Anti virus. In any case, have a complete scan of your PC with the latest Anti Virus Updates. Still the problem persists ?

Go to Run and type X:\autorun.inf and enter, where ‘X’ is the drive letter which is suffering from this problem. (If the problem is with D Drive- type D:\autorun.inf). A text file appears usually with two or three lines mentioning ‘Copy.exe’ or there might be an ocean of letters which gives no meaning to the human brain. Select the entire content of this file and delete it. Now close the empty file and it will ask for saving changes. Click YES and if your YES is accepted by the PC, your problem is solved. Simply restart your machine and double click with full confidence to find your drive opens without any tussle.

And if your YES is not accepted by the PC and it says that the file is read-only or hidden and doesn’t permit you to save the file or prompts for saving it into another location or on another file name, press CANCEL and close the file again and Click NO when prompted to save.
Now we have to take a complete turn around. First of all we must make a RECOVERY CONSOLE for Windows which is inbuilt in the Installation CD's i386 Folder..

To make the RECOVERY CONSOLE, insert the WINDOWS XP /WINDOWS 2003 CD into your CD Drive. Go to RUN and type X:\i386\winnt32 /cmdcons and press Enter. (Where ‘X’ is the Drive letter of your CD Drive.). Click next, next in the following windows and Cancel the Update Now message. Finally you reach a Completion screen and press OK (FINISH). The details are avilable at http://santhosh.themebin.com/blog/tutorials/using-recovery-console-in-xp/

Now restart your PC and you will get a BOOT MENU with two options (Provided you have only one OS loaded), One will be your Microsoft Windows XP and other will be Microsoft Windows Recovery Console. With the down arrow key select Recovery Console and press enter. You will enter into the Black Background of Recovery console. After loading the necessary services and drivers the console will ask you to select your Windows OS. (Normally you will have to enter ‘1’ provided your Windows is installed in C drive. Now the console will prompt for Administrator Password and after giving the password you will be provided with a prompt, C:\WINDOWS. Type CD \ and enter to go to the Root C.

On the C:\ type DIR and enter
You will get a list of all the files and folders of C Drive. Here the important thing to notice is that in front of some files it will be indicated S, R, H, SHR. These are the file attributes. ‘S’ indicate System file, ‘R’ indicates Read Only files and ‘H’ indicates hidden files. ‘SHR’ means a file with attributes System, Read-Only and Hidden. A file with these attributes can not be deleted or edited till the attributes are removed.

Look for a file named autorun.inf. This file will be prefixed with attributes SHR. Type attrib –SHR autorun.inf (note the space after attrib) and enter to remove the attributes. Now you can delete the autorun.inf by giving command del autorun.inf

Also look for a file with .exe extension in a range of 1400KB size (names may vary like mvo.exe, hffud.exe, vb.exe) with SHR attributes. Remove attributes and delete the file in the same manner as you removed autorun.inf. Repeat this procedure in all the infected drives and after finishing all, type EXIT and enter to restart your PC. See you have removed the DOUBLE CLICK TROUBLE successfully.
Add to Technorati Favorites
cool hit counters
download an html hit counter

C:\Recycled\SVCHost.exe

This error haunts Windows users during each log on. In fact SVCHOST is an essential service running in windows. The message is caused normally by the residue string left by a Trojan sort of Malware which was cured or quarantined by an Anti Virus. To remove this nuisance message, a bit of registry editing is required.

For beginners-Go to Run in start menu and type 'regedit' then enter. You will get the windows registry opened. Navigate to HKEY_CURRENT_USER and expand it. Now further expand it till you reach SOFTWARE > MICROSOFT > WINDOWS NT > CURRENT VERSION >EXPLORER > WINLOGON. Click on the WINLOGON key on the left pane and on the right pane you can see an entry named Shell. Double click on it and a box appears with the Value of the String. In the Value box you will see Explorer.exe C:\Recycled\Svchost.exe. Now carefully select the text starting from C:\Recycled\Svchost.exe and delete it. The value box should have only Explorer.exe. Press OK. Close the Registry Editor and restart your machine. That should solve the problem.
Add to Technorati Favorites
cool hit counters
download an html hit counter